
TM 5-5420-227-24
RESERV OI R QU ADRAN T REPLACEM EN T (She e t 3 of 4 )
CLEANING:
1.
Using putty knife, remove sealing compound from mating surfaces of reservoir quadrant
and vehicle.
WARN I N G
Cle a ning a ge nt spe c ifie d is fla m m a ble . U se only in w e ll ve nt ila t e d a re a s. K e e p a w a y
from fla m e s, spa rk s. or he a t . Do not sm ok e w hile using. Prevent contact with eyes,
m out h, a nd/or sk in. We a r rubbe r glove s w he n pe rform ing c le a ning proc e dure s.
Clean using rags and dry cleaning solvent.
2.
INSTALLATION:
N OT E
Be fore inst a lling, use pipe t a pe on a ll m a le
t hre a ds. St a rt t a pe on se c ond t hre a d so
t a pe w ill not e nt e r hydra ulic syst e m .
1.
Using putty knife, apply sealant to mating surfaces
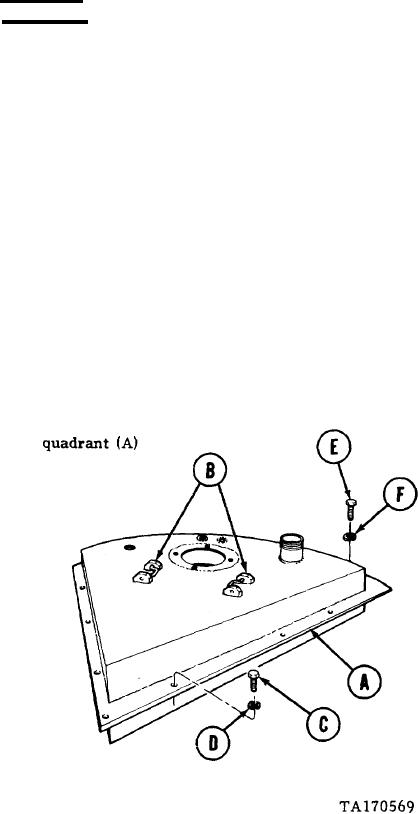
of vehicle and reservoir quadrant (A).
Attach sling and lifting device to two handles (B).
2.
Have technician operating hoist slowly lift
3.
into position over vehicle.
While two technicians guide reservoir
4.
quadrant (A), have technician operating
hoist slowly lower reservoir quadrant (A)
into position on vehicle.
5.
Remove lifting device and sling from two
handles (B).
6.
Using 3/4 inch socket, install seven
screws (C) and new lockwashers (D).
7.
Using 1-5/16 inch socket, install four
screws (E) and new lockwashers (F).
Go on to Sheet 4
4-94

