
TM 5-5420-228-24
VALVE BANK ASSEMBLY AND BRACKETS REPLACEMENT (Sheet 9 of 17)
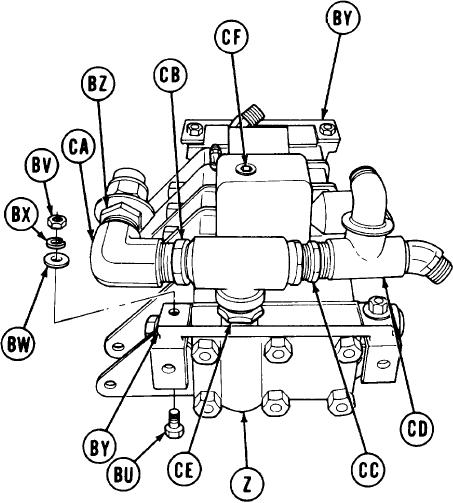
Using 5/8 inch wrench to hold four
52.
screws (BU), use 3/4 inch wrench
to loosen four nuts (BV).
Manually remove four screws (BU),
53.
.
nuts (BV), flat washers (BW), and
lockwashers (BX). Throw lock-
washers (BX) away.
Remove two brackets (BY) from
54.
valve bank (Z).
Using 1-3/8 inch wrench, remove
55.
adapter (BZ) and attached parts
from elbow (CA).
Holding adapter (CB) with 1-3/8
56.
inch wrench, use adjustable wrench
to remove elbow (CA).
Holding adapter (CC) with 1-1/4 inch wrench, use adjustable wrench to remove tee (CD)
57.
and attached parts from adapter (CC).
Using 1-3/8 inch wrench, remove adapter (CE) and attached parts from valve bank (Z).
58.
Using 3/8 inch screw key, remove pipe plug (CF).
59.
CLEANING AND INSPECTION:
WARNING
Cleaning agent specified is flammable. Use only in well ventilated areas. Keep away
from flames, sparks, or heat. Do not smoke while using. Prevent contact with eyes,
mouth, and/or skin. Wear rubber gloves when performing cleaning procedures.
1.
Using dry cleaning solvent, clean all parts.
2.
Using rags, dry all parts.
Inspect all parts for breaks, cracks, and
3.
excessive wear. Replace bad parts.
TA251710
Go on to Sheet 10

