TM 5-5420-227 -24
CLU T CH ASSEM BLY REPLACEM EN T AN D REPAI R (She e t 5 of 9 )
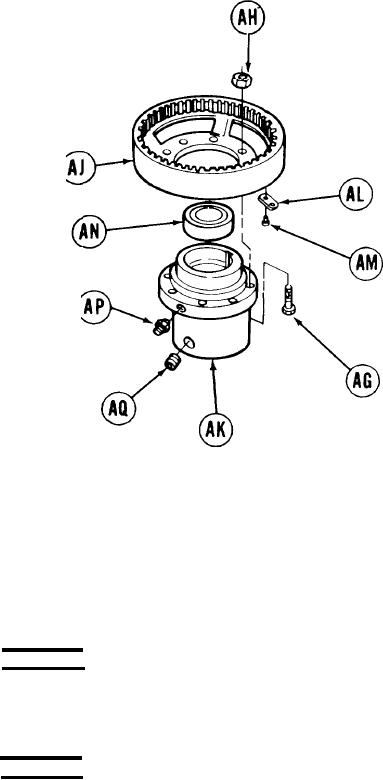
Using 9/16 inch wrench to hold screws (AG),
25.
use 9/16 inch socket to remove eight nuts (AH).
26.
Using hammer, tap out screws (AG)
from flange (AJ).
27.
Remove flange (AJ) from hub (AK).
28.
Using hammer and chisel, under nameplate (AL), remove two drive screws (AM) and
nameplate (AL). Throw drive screws (AM) away.
29.
Using bearing puller, remove bearing (AN) from hub (AK).
Using 7/16 inch wrench, remove lubrication fitting (AP).
30.
Using 3/8 inch screw key, remove setscrew (AQ).
31.
CLEANING AND INSPECTION:
WARNING
Cle a ning a ge nt spe c ifie d is fla m m a ble . U se only in w e ll ve nt ila t e d a re a s. K e e p a w a y
from fla m e s, spa rk s, or he a t . Do not sm ok e w hile using. Pre ve nt c ont a c t w it h e ye s,
m out h, a nd/or sk in. We a r rubbe r glove s w he n pe rform ing c le a ning proc e dure s.
WARN I N G
Com pre sse d a ir use d for c le a ning purpose s w ill not e x c e e d 3 0 psi.
U se only w it h e ffe c t ive c hip gua rding a nd pe rsona l prot e c t ive
e quipm e nt goggle s/shie ld, glove s, e t c .
Using rags and solvent, clean all metal parts and dry with compressed air.
1.
Lubricate bearing with grease and wrap in oiled paper.
2.
TA170515
Go on to Sheet 6
4-37

