TM 5-5420-228-24
OVERHEAD CYLINDER HOSE ASSEMBLIES (DA5 AND DA6) AND HYDRAULICS REPLACEMENT
(Sheet 2 of 3)
NOTE
Hose assembly in step 6 is being removed to
provide wrench clearance for removal of parts
in the following steps.
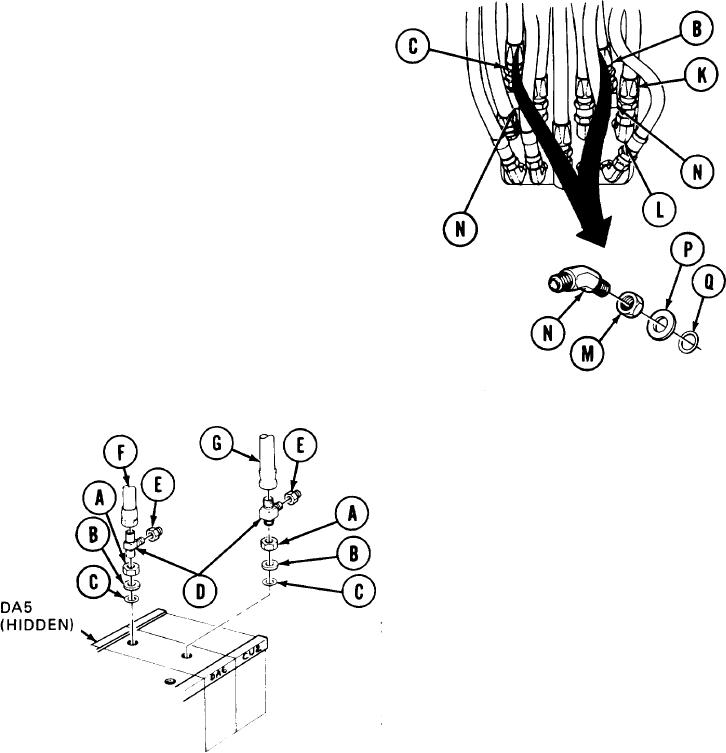
Using 1-1/4 inch wrench remove hose
6.
assembly "DA2" (K) from elbow (L).
Using 1-1/4 inch wrench, remove hose
7.
assemblies "DA6" (C) and "DA5" (B).
Using 1-1/4 inch wrench, loosen elbow nuts
8.
(M) on elbows (N).
Using adjustable wrench, remove elbows
9.
(N), nuts (M), flatwashers (P), and pack-
i n g s preformed (Q). Throw preformed
packings (Q) away.
INSTALLATION:
NOTE
Remove caps and plugs as necessary during installation. Tape
all male threads before installation with pipe tape:
Manually install nuts (A), flat washers
1.
(B), and new preformed packings (C) onto
tees (D).
Manually install and aline tees (D).
2.
Using adjustable wrench to hold tees (D),
3.
use 1-1/4 inch wrench to tighten nuts (A).
4.
Using adjustable wrench to hold tees (D), use 1-1/4 inch wrench to install adapters (E).
Using adjust able wrench to hold tee (D), use 1-1/4 inch wrench to install hose assembly
5.
"DA5" (F).
Using adjustable wrench to hold tee (D), use 1-1/4 inch wrench to install hose assembly
6.
"DA6" (G).
TA251569
Go on to Sheet 3
3-171

