TM 5-1940-322-24
0115 00
ENGINE REPLACEMENT (Contd)
INSTALLATION
NOTE
Perform steps 1 and 2 if transmission was removed from engine.
1.
Install transmission driveplate on engine (WP 0121 00).
2.
Install transmission on engine (WP 0125 00).
3.
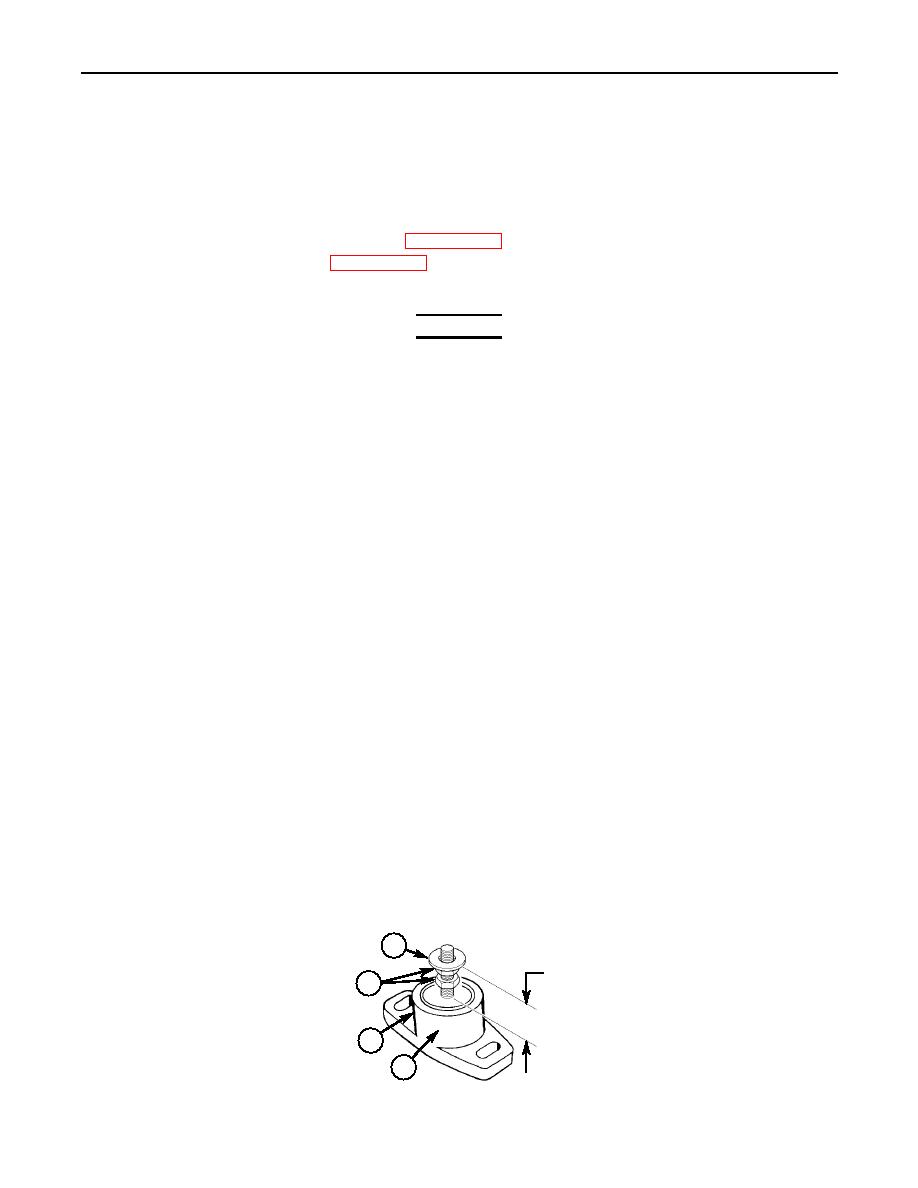
Make sure engine mounting brackets (2) are adjusted to 1.750 in. (4.445 cm) from top of base (3) to top
of washer (1) and jamnuts (4) are tight before installing engine.
WARNING
All nonessential personnel must stand clear during lifting
operations. Failure to comply may result in injury to personnel.
Keep hands clear of lifting area. Use pry bar to free engine during
lifting operations. Failure to comply may result in injury to
personnel.
Lifting device must have a weight capacity greater than the weight
of the engine and transmission. Failure to comply may result in
injury to personnel and/or damage to equipment.
4.
Install chain or sling (9) on engine lifting brackets (6) and (8) on engine (7).
5.
Connect lifting device (5) to chain or sling (9).
6.
Lift engine (7) from suitable engine stand or blocks and place engine (7) on four engine mounting
brackets (2) in boat.
7.
Install four washers (11) and new locknuts (10) on engine mounting brackets (2). Tighten locknuts (10)
to 125 lb-ft (169 Nm).
8.
If removed, install hoses (15) and (20) of keel cooler inlet and outlet pipes (14) and (21) on keel cooler
inlet and outlet ports (16) and (18) and tighten hose clamps (17) and (19).
9.
Install hose (28) on other end of keel cooler inlet pipe (14) to engine coolant inlet connection (26) and
tighten hose clamp (27).
10.
Install hose (23) on other end of keel cooler outlet pipe (21) to thermostat housing (13) and tighten
hose clamp (22).
11.
Install vent hose (12) to elbow (24) on keel cooler outlet pipe (21).
12.
Install battery positive (+) cable (29), electrical lead (30), and battery positive (+) cable (39) on starter
solenoid stud (31), as noted at removal, with new lockwasher (38) and nut (37).
13.
Install ground lead (33) and two battery negative (-) cables (36) on ground stud (32) of starter (40) as
noted at removal, with new lockwasher (34) and nut (35).
14.
Slide new insulaton sleeve (41) over one lead wire before connecting fast fuse lead R terminal (47) to
port alternator lead R terminal (45) or fast fuse lead U terminal (47) on starboard alternator lead U
terminal (45) with two washers (44), screw (46), and new locknut (43). Apply three layers of pressure
tape (42) around terminals (45) and (47) and slide insulation sleeve (41) over terminals and leads.
15.
Connect engine wiring harness connector (48), as noted at removal, to boat wiring harness
connector (49).
1
1.750 IN.
4
(4.445 CM)
~
3
2
0115 00-8


