
TM 5-5420-202-20-4
SMOKE GENERATOR ELBOW-TO-SOLENOID FUEL HOSE REPLACEMENT (Sheet 2 of 2)
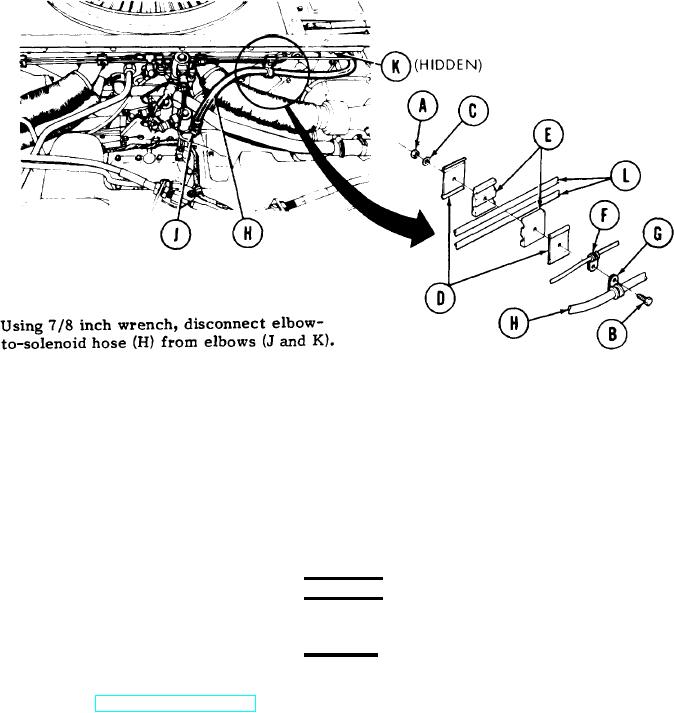
1.
Using 7/16 inch wrench to hold nut (A) and 7/16 inch wrench on screw (B), remove nut
(A), lockwasher (C), and screw (B) securing retaining straps (D), pads (E), and clamps
(F and G).
Remove retaining straps (D), pads (E), and clamps (F and G).
2.
3.
4.
Remove elbow-to-solenoid hose (H). Remove clamp (G) from hose (H).
INSTALLATION:
1.
Install clamp (G) onto elbow-to-solenoid hose (H).
Position and connect elbow-to-solenoid hose (H) to elbows (J and K). Using 7/8 inch
2.
wrench, tighten hose (H) connections to elbows (J and K).
3.
Install pads (E), retaining straps (D), and clamps (F and G) to tube assemblies (L).
4.
Install screw (B), lockwasher (C), and nut (A) to tube assemblies. Using 7/16 inch wrench
to hold nut (A) and 7/16 inch wrench on screw, tighten screw (B).
WARNING
Do not activate smoke generator in a building or closed area or with personnel near.
CAUTION
Always be aware of wind direction and speed when using smoke generator.
Start engine (TM 5-5420-202-10) and run until normal operating temperatures are attained.
5.
smoke generator. Shut down engine.
Check smoke generator lines for leaks. Correct as necessary.
6.
Install engine shroud (page 9-3 ).
7.
TA248772
End of Task
21-31