
TM 5-5420-202-20-4
SMOKE GENERATOR SOLENOID REPLACEMENT (Sheet 3 of 5)
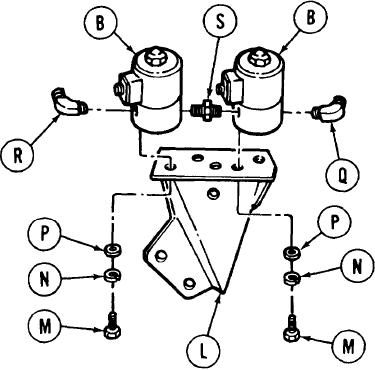
Using 5/16 inch wrench, remove four
8.
screws (M), lockwashers (N), and flat
washers (P) securing solenoid valves
(B) to bracket (L).
Remove solenoid valves (B) with fittings
9.
as a unit.
Using 3/4 inch wrench, remove 90-degree
10.
elbow (Q) from input port of solenoid
(B).
Using 9/16 inch wrench, remove 45-
11.
degree elbow (R) from output port of
solenoid (B).
Using 5/8 inch wrench, remove nipple (S) from solenoid valves (B).
12.
INSTALLATION:
1.
Check position of electrical connector on solenoid valves. Hold valve with outlet port
to your left. Electrical connector must be 45 degrees from outlet port and pointing
toward you. If connector must be repositioned, place valve in soft-jawed vise. Loosen
acorn nut on top of valve and rotate connector to correct position. Using 3/4 inch socket
and torque wrench, tighten acorn nut to 50 in-lb (5-6 Nm).
TA248768
Go on to Sheet 4