ARMY TM 5-5420-212-10-1
MARINE CORPS TM 08676A-10/1-1
(2)
Connect the hooks of the anti-flutter tackle to the carrying bar brackets of the top panel, one on the outside of
bridge, the other on the inner.
(3)
Ensure ropes are kept free of any adjacent light tackle.
(4)
The anti-flutter tackle is automatically tensioned when the link is lowered and post tensioning posts are in their
final position.
e.
Tensioning
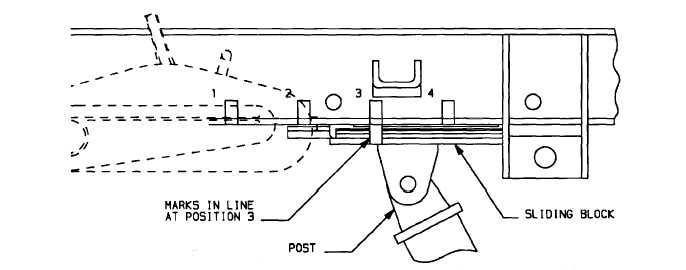
The post tensioning assembly tensions the link using pullers (para. 4-17). When tensioning the link, the check marks
on the post tensioning frame and slide block are used to ensure equal loading on all four pullers. If necessary, one bridge
girder at a time can be tensioned. For convenience, during the build, the puller handles should have been placed in the well of
the bottom panel holding the post tensioner.
(1)
All puller operators start together at mark I and proceed until mark 2 is reached.
(2)
All operators proceed to mark 3 and check.
(30
Finally proceed to mark 4 and insert launching nose pin through hole. Secure with retainer clip.
(4)
Operate pullers to slacken puller cables to transfer the load off the cables and onto the pin, then place handle in
well of bottom panel for later use.
4-17
OPERATION OF PULLER
The puller is used with the jacking bracket and davits to raise or lower the bridge. It is also used on the post
tensioning assembly to apply or release tension in the link chain. The puller is operated using a telescopic handle [para. 1-9c.
step (17)]
a.
Threading Cable Into Puller and Taking Up Slack
(1)
Uncoil cable into a straight line to prevent loops which might untwist the strands or form kinks when under
tension.
(2)
Open the jaw clamp (1) by pushing it towards lever (2) using the heel of the hand. A definite "click" 4-63 can be
heard when the jaws are properly opened.
4-63


